|
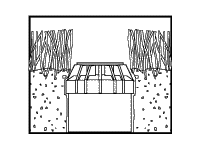
Installation height:
The PGM pop-up sprinkler should be installed at finish grade as shown in the illustration. |
 |
Arc Adjustment:
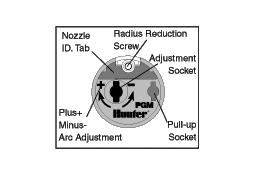 |
Adjustable heads are preset to approximately 40°.
- Rotate the nozzle turret counterclockwise to the left stop.
- Now, rotate the nozzle turret clockwise to the right stop. This is the fixed side of the arc. The nozzle turret must be held in this position for arc adjustments. The right stop does not change.
|
To increase arc:
- Insert the key end of the Hunter wrench into the adjustment socket on top of the sprinkler.
- While holding the nozzle turret at the right stop, turn the wrench clockwise. (Note: all adjustments can be made with less than one full turn of the adjusting wrench.)
- The wrench will stop turning when adjusted to the maximum arc (360°). Do not go past this stop.
- Adjust to any arc between 40°-360°.
To Decrease arc:
- Insert the key end of the Hunter wrench into the adjustment socket.
- While holding the nozzle turret at the right stop, turn the wrench counterclockwise.
- The wrench will stop turning when adjusted to the maximum arc (360°). Do not go past this stop.
- Adjust to any arc between 40° and 360°.
|
 |
Radius adjustment
|
To decrease radius:
- Turn nozzle-retainer/radius-adjustment screw clockwise. This can reduce radius up to 25%.
- If an even smaller radius is desired, install a smaller nozzle. This will affect precipitation rate.
To increase radius:
- Turn nozzle-retainer/radius-adjustment screw counterclockwise.
- If larger radius is desired, install a larger nozzle. This will affect precipitation rate.
|
|
Precipitation rate adjustment
|
|
To increase precipitation:
- Remove existing nozzle.
- Replace with larger size.
- Adjust radius.
|
|
To decrease precipitation:
- Remove existing nozzle.
- Replace with smaller size.
- Adjust radius.
|
Aligning the right (fixed) side of the arc
If the right side of the arc is not properly aligned, the results may be a wet walkway or a dry turf area. The right side arc can easily be realigned. One way to realign the right stop is to turn the whole sprinkler body assembly and the fitting below it, left or right to the desired position. This may require temporary removal of the soil around the sprinkler to allow you to grip the sprinkler housing.
Another way to reset the right arc is to unscrew the body cap counterclockwise and remove the internal assembly from the body. Once removed, rotate the nozzle turret to the right stop, screw the internal assembly back into the body with the nozzle aligned to the right side of the area you want irrigated. At this point you have realigned the right arc stop, and you can adjust the left arc to an appropriate setting.
Note: It is not necessary to dig up and remove the whole sprinkler to realign the right arc.
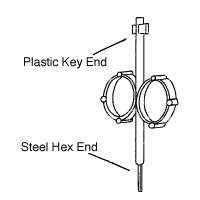
Nozzle Removal
- If the top of the screw is below the top of the turret, the screw must be turned counter-clockwise until it is flush with the top before removing
the nozzle.
- If the screw is flush with the top of the nozzle turret, the nozzle can be installed by reversing the steps below.
 |
|
 |
|
 |
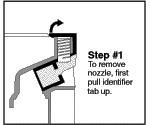
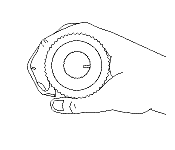
Step #1
Use hex end of Hunter wrench to pry nozzle identifier tab up from top of sprinkler. |
|
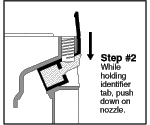
Step #2
While holding identifier tab, push down and forward on nozzle. |
|
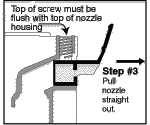
Step #3
Pull nozzle straight out. Top of screw must be flush with top of nozzle housing. |
Removing Filter Screen for Cleaning
Unscrew body cap & remove internal riser.
 |
|
 |
|
 |
Step #1
If sprinkler has drain check valve, remove with needle nose pliers. |
|
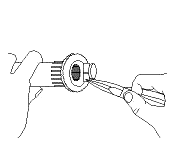
Step #2
With needle nose pliers, grasp large rib (Fig. 3) on the inside of the screen and pull firmly to remove screen. |
|
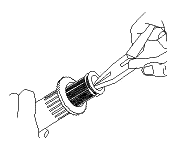
Step #3
Note the position of the large rib in comparison to the date code, which is located on the bottom of the riser.
|
This information was obtained from a publication by
Hunter Industries Incorporated - The Irrigation Innovators
1940 Diamond Street - San Marcos, California - U.S.A. - TEL: (1) 760-744-5240
- FAX: (1) 760-744-7461
| If you've benefited from the help we've provided on our site but you choose not to purchase your parts from us, we hope you will consider making a small donation to help offset the cost of maintaining this site. To make a donation, you can click on a button below and follow the on-screen instructions. |
|
|
|
|
Thanks!
The staff at WaterTips.com |
|