|
|

 |
 |
 |
 |
 |
 |
|
INTRODUCTION AND INSTALLATION
INTRODUCTION
The Hunter SRP programming system is designed to provide enhanced water management capabilities for users of Hunter SRC, Pro-C or ICC series controllers. Using the unique PC-compatible software, you can quickly and easily develop precise watering schedules for one or more controllers. Schedules can be created based upon seasonal or site-specific needs; you can review all information before implementing it with the controller. Once you create a schedule, you can transfer it to the controller using the programmer. The programmer can hold up to two different schedules, which you can copy into an unlimited number of field controllers.
INSTALLING THE SRP SOFTWARE
Note: In Windows 95 or 98, you can complete the installation by dragging the SRP icon onto your desktop in order to make starting the program easier:
|
SETTING UP A WATERING PROGRAM
Once the SRP software is installed in your computer, you can use it to create, analyze, and store irrigation schedules. You can then load these schedules into the SRP Programmer device, which can be used to program an unlimited number of SRC, Pro-C or ICC controllers. The programmer device can be re-programmed and reused an unlimited number of times.
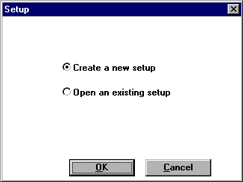
CREATE A NEW OR EXISTING SCHEDULE
After clicking the SRP icon, a screen will appear giving you the option to "Create a New Setup" or "Open an Existing Setup". Choose a new setup unless you have a previously saved SRP program.
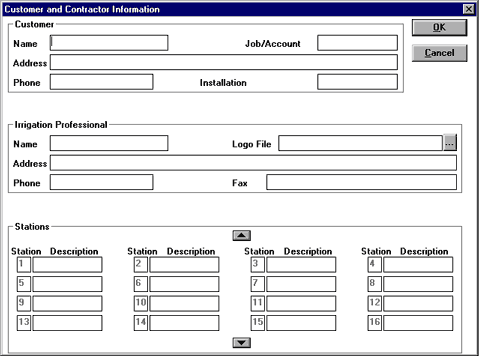
CUSTOMER AND CONTRACTOR INFORMATION
After choosing "Create a New Setup", the "Customer and Contractor Information" screen will appear. This is an optional section that allows the irrigation professional to create a door reference chart that can be used later for quick reference. Fields are provided for both customer and contractor contact information. The contractor company logo can also be entered so that it prints on the top of the form. (Logo must be 100 X 100 pixels, .83 in. x .83 in., or 2.11 cm. x 2.11 cm.) In addition to information about the customer and contractor, there is also space for a short description of each of the stations. The chart can then be printed out and stored close to the controller for later reference. Click on OK to continue or when form is complete.
SELECT CONTROLLER MODEL
Begin by specifying what controller model you're scheduling. The SRP software supports three different types of controllers:
If you selected "Create a New Setup" the program will automatically take you through all the steps you will need to setup a complete program. If you would like to setup your controller in a different manner, you can click Cancel at any time to go to the main screen. To set up a schedule for an SRC, choose SRC , then model 600 (six-station) or 900 (nine-station). For the Pro-C, click on Pro-C, and then specify the number of stations, from 3 to 12. For the ICC, click on ICC, and then specify the number of station, from 8 to 48. When you're done, choose OK. You're now ready to set up a schedule for the controller model you've selected.

For instructions on setting up the SRC controller continue here.
For instructions on setting up the Pro-C controller continue here.
For instructions on setting up the ICC controller continue here.
Note: To switch to a different controller at another time choose Setup from the main menu, then Controller Model. When this is done a reference screen will appear on the screen prompting you to save your setup. See "Saving Your Watering Schedule", for more information on how to save your setup. |

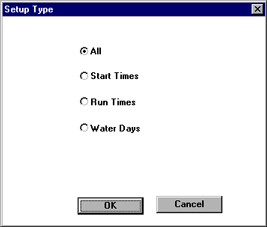
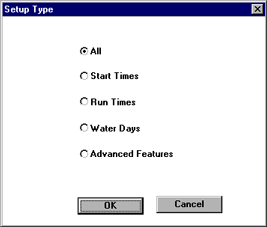
SRC: SETUP TYPE
On the Setup Type screen you can choose whether to setup all your program information together or separately. Your choices are Setup All, Start Times, Station Run Times, or Water Days. (Figure 5)
SRC: SETUP ALL
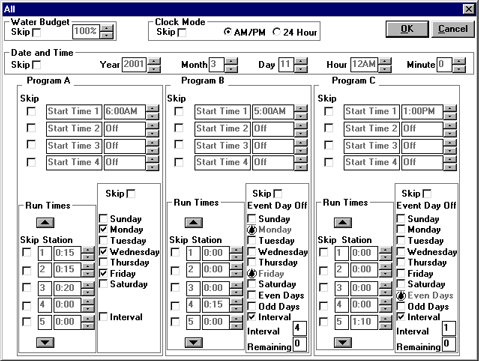
The Setup All option gives you a handy way to view all programs, start times, run times, and water days on a single screen. If you choose, you can make schedule changes here, or use the individual menu items. You can view and make changes to each program's start times, run times, and water days here. Also, you can change the clock mode and date. (Figure 6)
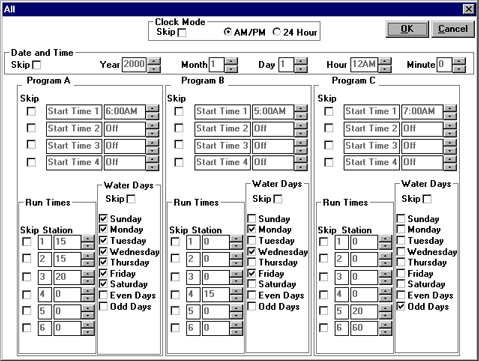
Note: A skip function is available for each field. This function is helpful when making revisions to an existing program. By selecting skip for a specific item, the data will not be changed in the controller when the new program is uploaded into the controller. For example, the SRP will automatically change the time on the controller to the time when the new program was downloaded to the SRP module. To prevent changing the time, selecting skip for the clock mode would be recommended. |
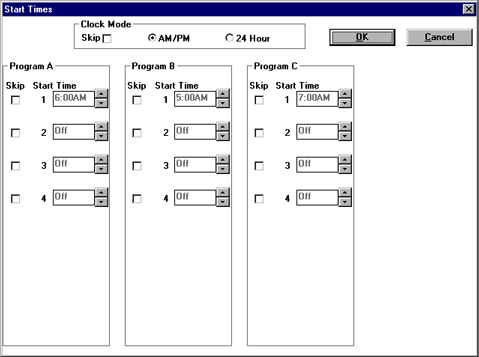
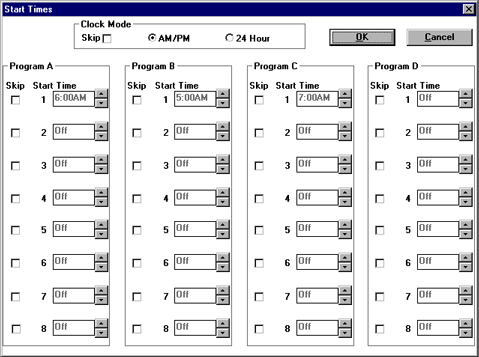
SRC: SET START TIMES
The SRC supports four start times for each of its three programs.
You can return at any time and change any of the times you've set. To change start times at a later time choose Setup, then Start Times (or press Alt-S-S).
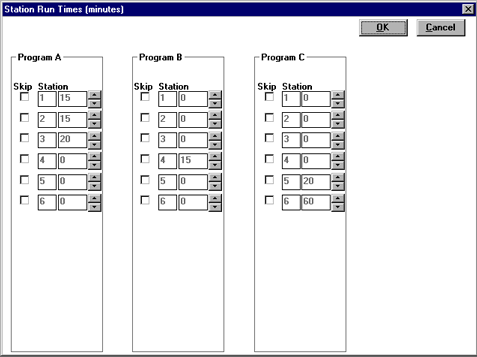
SRC: SET STATION RUN TIMES
The SRC supports run times from 0-99 minutes on all stations for all programs.
You can return at any time and change any of the run times you've set. To change run times at a later time choose Setup, then Station Run Times (or press Alt-S-R).
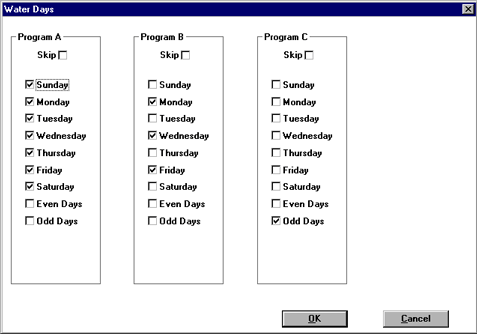
SRC: SET WATER DAYS
The SRC supports days-of-the-week and odd/even-days watering. Only one watering option can be selected for any one program.
You can return at any time and change any of the days you've set. To change the water days at a later time choose Setup, then Water Days (or press Alt-S-W).
Note: If you wish to cancel any settings that you have just made, choose Setup, then New. |
PRO-C: SETUP TYPE
On the Setup Type screen you can choose whether to setup all your program information together or separately. Your choices are Setup All, Start Times, Station Run Times, Water Days or Advanced Features.
PRO-C: SETUP ALL
The Setup All option gives you a handy way to view all programs, start times, run times, and water days on a single screen. If you choose, you can make schedule changes here, or use the individual menu items. You can view and make changes to each program's Start Times, Run Times, and Water Days here. Also, you can change Water Budgeting, Clock Mode and the Date.
Note: A skip function is available for each field. This function is helpful when making revisions to an existing program. By selecting skip for a specific item, the data will not be changed in the controller when the new program is uploaded into the controller. For example, the SRP will automatically change the time on the controller to the time when the new program was downloaded to the SRP module. To prevent changing the time, selecting skip for the clock mode would be recommended. |
PRO-C: SET START TIMES
The Pro-C supports four start times for each of its three programs.
You can return at any time and change any of the times you've set. To change start times at a later time choose Setup, then Start Times (or press Alt-S-S).
PRO-C: SET STATION RUN TIMES
The Pro-C supports run times from 0-6 hours for stations assigned to programs A, B, or C. You can also use a Water Budget setting on the Pro-C controller.
To set a run time, move the cursor to the arrow buttons next to the time, and hold down the left mouse button to dial up or down.
Water Budget: With the Pro-C controller, you can use this setting to adjust your overall watering amount by season without adjusting run times individually. The water budget can be set from 10% to 150% in 10% increments. For example, in the rainy season, you can reduce watering by half by setting water budget to 50 percent. Every run time automatically will be reduced by half. Likewise, run times can be increased up to 50 percent during dry periods.
Note: Even with water budgeting you cannot increase station run times beyond six hours. It is recommended that water budget be set a 100% for the downloaded program and then used on the controller to adjust for minor weather changes.
You can return at any time and change any of the run times you've set. To change the run times at a later time choose Setup, then Station Run Times (or press Alt-S-R).

PRO-C: SET WATER DAYS
The Pro-C supports specific days-of-the-week and odd/even-days watering, as well as interval watering. Only one watering option can be selected at any one time for any one program.
 will illuminate over this day.
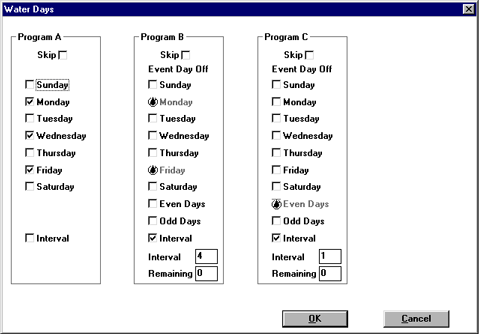
Notes: When interval watering is used, days remaining cannot exceed the number of days in the interval. |
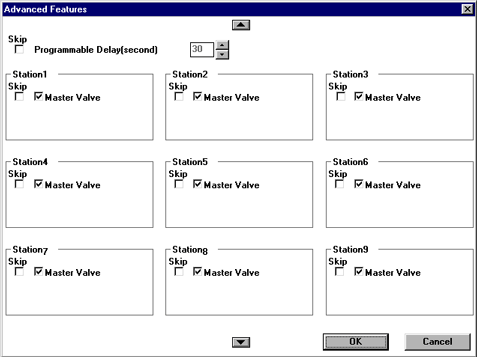
PRO-C: ADVANCED FEATURES
When you select the Pro-C under Controller Model, another option becomes available on the Setup menu: Advanced Features. This allows you to set the following special features for a Pro-C controller:
Programmable Delay Between Stations
You can set a programmable delay between stations in 1-second increments, up to 1 minute, then in 1-minute increments to 4 hours.
Pump Master/Valve Operation
The Pro-C supports a programmable master valve or pump. Click on any station or stations that will use the master valve or pump circuit. A check  mark will show in the box when the pump circuit is on.
ICC: SETUP TYPE
On the Setup Type screen you can choose whether to setup all your program information together or separately. Your choices are Setup All, Start Times, Station Run Times, Water Days, or Advanced Features.
ICC: SETUP ALL
The Setup All option gives you a handy way to view all programs, start times, run times, and water days on a single screen. If you choose, you can make schedule changes here, or use the individual menu items. You can view and make changes to each program's Start Times, Run Times, and Water Days here. Also, you can change Water Budgeting, Clock Mode and the Date.

Note: A skip function is available for each field. This function is helpful when making revisions to an existing program. By selecting skip for a specific item, the data will not be changed in the controller when the new program is uploaded into the controller. For example, the SRP will automatically change the time on the controller to the time when the new program was downloaded to the SRP module. To prevent changing the time, selecting skip for the clock mode would be recommended. |
ICC: SET START TIMES
The ICC supports eight start times for each of its four programs.
You can return at any time and change any of the times you've set. To change start times at a later time choose Setup, then Start Times (or press Alt-S-S).
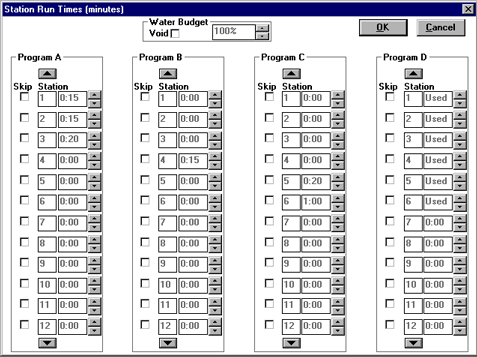
ICC: SET STATION RUN TIMES
The ICC supports run times from 0-2 hours for stations assigned to programs A, B, or C and 0-12 hours for stations assigned to program D (typically the drip program) . You can also use a Water Budget setting on the Pro-C controller.
To set a run time, move the cursor to the arrow buttons next to the time, and hold down the left mouse button to dial up or down.
Water Budget: With the ICC controller, you can use this setting to adjust your overall watering amount by season without adjusting run times individually. The water budget can be set from 10% to 150% in 10% increments. For example, in the rainy season, you can reduce watering by half by setting water budget to 50 percent. Every run time automatically will be reduced by half. Likewise, run times can be increased up to 50 percent during dry periods.
However, bear in mind that water budgeting won't increase beyond two hours for programs A, B, and C, or 12 hours for program D. Note: Even with water budgeting, you cannot increase your run times beyond the maximum allowable for the controller.
It is recommended that water budget be set a 100% for the downloaded program and then used on the controller to adjust for minor weather changes.
You can return at any time and change any of the run times you've set. To change the run times at a later time choose Setup, then Station Run Times (or press Alt-S-R).
ICC: SET WATER DAYS
The ICC supports days-of-the-week and odd/even-days watering, as well as interval watering. Only one watering option can be selected at any one time for any one program.
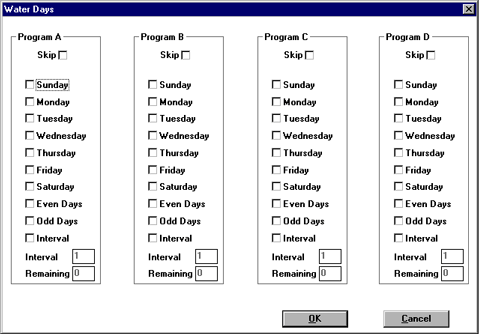
Note: When Interval watering is used, days remaining cannot exceed the number of days in the interval. Note: If you wish to cancel any settings that you have just made, choose Setup, then New. |
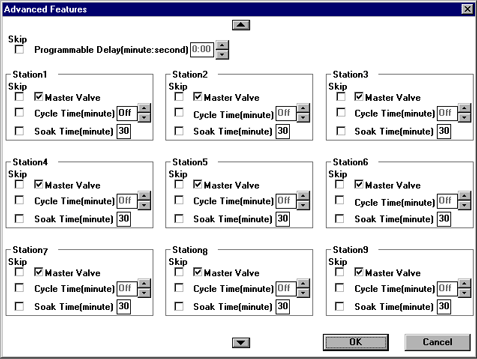
ICC: ADVANCED FEATURES
When you select the ICC model under Controller Model, another option becomes available on the Setup menu: Advanced Features. This allows you to set the following special features for an ICC controller:
Programmable Delay Between Stations: You can set a programmable delay between stations in 5-second increments, up to 1 minute 40 seconds. This delay is typically used in commercial applications to allow for the slow closing speed of large valves.
Pump Master/Valve Operation: The ICC supports a programmable master valve or pump. Use an X to designate any station or stations that will use the master valve or pump circuit.
Cycle and Soak Settings: The Cycle and Soak feature allows the user to split each station's run time into more usable, shorter duration waterings. This feature is particularly applicable for slopes and tight soil (such as clay) because Cycle and Soak will help prevent excessive run off. You should enter the Cycle time as a fraction of the station's watering time and the Soak time as the minimum soak required before watering the next portion. The total number of cycles is determined by taking the total programmed station run time and dividing it by the Cycle time.
The cycle time can be set between 1 and 60 minutes. The ICC allows you to break up a run time into several cycles, each with a specific cycle time. The soak time is the minimum time the controller will delay between cycles. The soak time can be set to any number from 1 to 60 minutes. A default soak time of 30 minutes is set up automatically.
SAVING YOUR SCHEDULE/CREATING MULTIPLE SCHEDULES
Once you've chosen a controller model and entered the irrigation schedule, run times and watering times, you can save the program for later use. You can build any number of different watering programs by saving the information you enter under different file names. For example, you might want a SMITH schedule, a JONES schedule, and so forth. (Note: If you are running Windows 3.1 or 3.11, you are limited to eight characters in your file name. If you are running Windows 95, there is no such limit).
To save a schedule you have set up, choose File, then Save. In the Save As dialog box, enter the name of the file, such as the examples given above. Leave the ".dat" extension, since that identifies the file to the SRP software as a data file.
Often, it may be easier to copy a schedule you've already set up, make modifications, and save it under a new name.
To do that:
To open an existing watering schedule:
Before you download a watering schedule to a controller, you must open the schedule using the SRP software. To do so, choose File, then Open. Then select the watering schedule you want. If you make changes to the schedule, be sure to save it by using File, then Save, to preserve the changes.
For convenience, the SRP software automatically saves the file in the "srpcomm" file already created during installation. You can save it elsewhere if you choose.
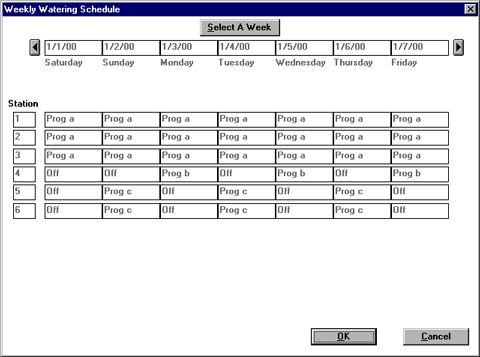
VIEW A WATERING SCHEDULE
The SRP software presents a concise view of each watering schedule by day or week. To view a schedule:
Viewing a day: Select a day, either by clicking on the arrows to the right and left of the date shown, or by clicking on Select a Day and choosing the date.
You can zoom in on a portion of the schedule by clicking on the magnifying glass at the lower right of the window, then moving to the schedule and clicking again.
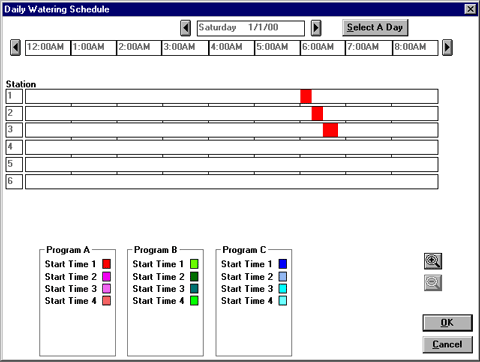
Viewing a week: You can view the schedule for any week. This view will show you which programs will run on which days.
COMMUNICATION PORT
The Communication Port setting tells the SRP software to which port the SRP programmer will be attached. (Other items, like a mouse and printer, can be attached to other ports.) Select the port you'll be using from the list.
Note: The SRP software will automatically choose the correct port if you attach an SRP Programmer, then select Auto Detect. |
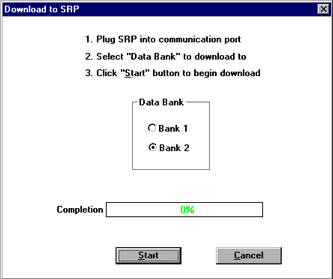
DOWNLOAD TO SRP PROGRAMMER
Once you've set up a watering schedule, you can download it to the SRP Programmer. Each SRP programmer can hold two separate schedules, one in each data bank.
INSTALLING THE SMARTPORT® ON THE CONTROLLER
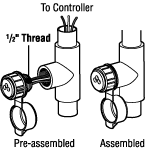
The SRP kit is shipped with a SmartPort® wiring harness, allowing for fast and easy use of the Hunter SRP and SRR remote control.
To utilize the SRP Control System you must install the SmartPort® outlet.
The SmartPort® is now ready for SRP programming.
NOTE: Any extension of the wiring on the SmartPort® may result in an error message in the controller display and possible malfunction of the remote unit due to radio interference. In some situations, lengthening of the harness may work fine, in others it may not work at all (it is site specific). In either case, extending the wiring harness should be done using shielded cable to minimize the possible effects of electrical noise. For easiest installation, order a new Hunter SmartPort® shielded cable wiring harness (part #SRR-SCWH) with a full 25 feet of shielded cable. |
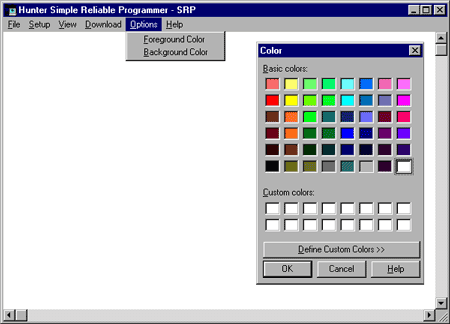
OPTIONS
You can easily change your screen colors with this option. This is especially useful for making a screen, such as a notebook computer, more readable.
USING THE SRP PROGRAMMER TO PROGRAM A CONTROLLER
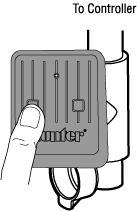
Once you've downloaded a schedule or schedules from the computer into the SRC Programmer, you can use the programmer in the field to program Hunter SRC, Pro-C or ICC controllers.
To utilize the SRP Control System you must install the SmartPort® outlet.
Note: The SRP does not keep track of time, so remember to enter the correct time of day after uploading. See the SRC, Pro-C or ICC Setup All section above for information on skipping the time/date field. |
FCC NOTICE
This controller generates radio frequency energy and may cause interference to radio and television reception. It has been type tested and found to comply with the limits for a Class B computing device in accordance with the specifications in Subpart J of Part 15 of FCC Rules, which are designed to provide reasonable protection against such interference in a residential installation. However, there is no guarantee that interference will not occur in a particular installation. If this equipment does cause interference to radio or television reception, which can be determined by turning the equipment off and on, the user is encouraged to try to correct the interference by one or more of the following measures:
If necessary, the user should consult the dealer or an experienced radio/television technician for additional suggestions. The user may find the following booklet prepared by the Federal Communications Commission helpful: "How to Identify and Resolve Radio-TV Interference Problems." This booklet is available from the U.S. Government Printing Office, Washington, D.C., Stock No. 004-000-00345-4 (price - $2.00 postpaid).
| |||||||||